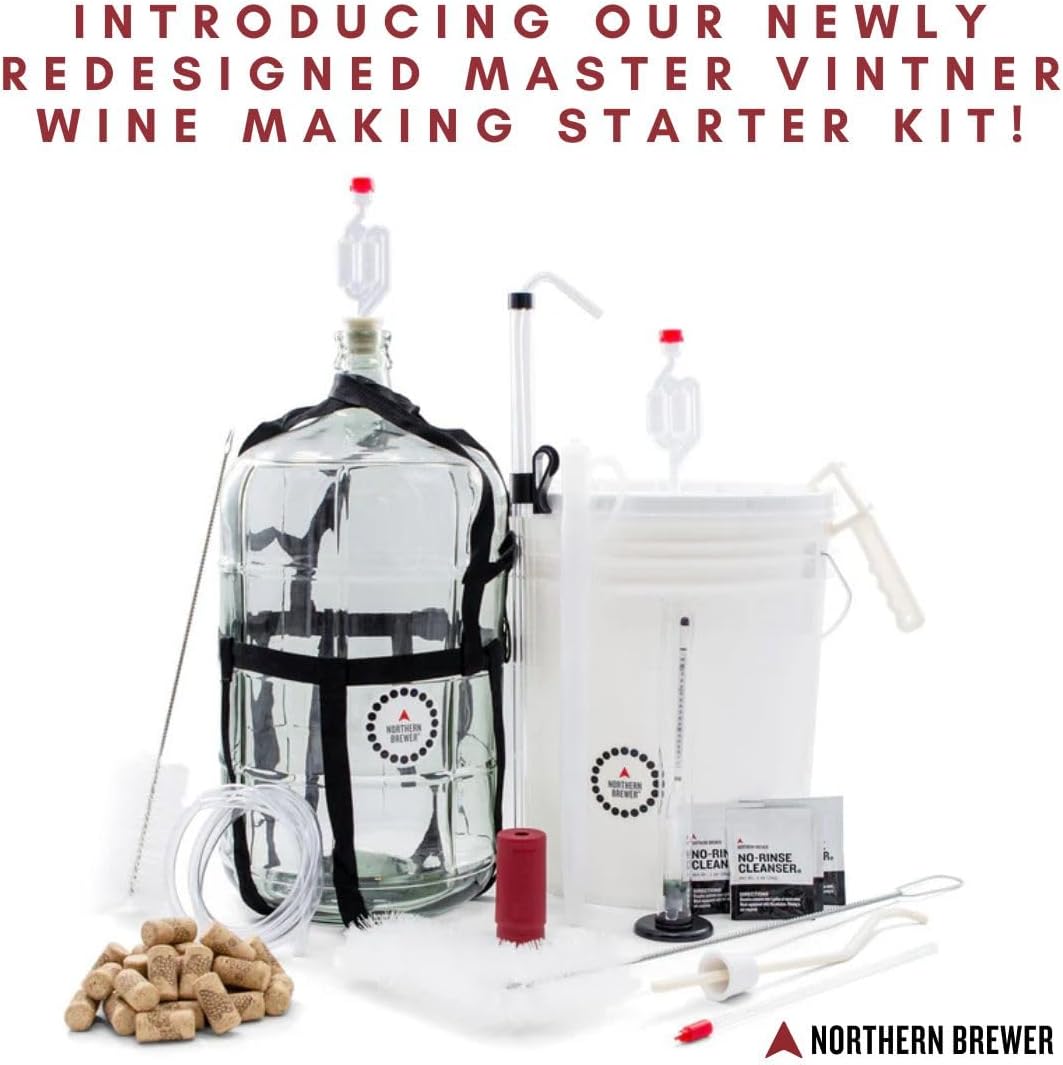
If you’ve ever fermented a batch of beer, you already understand the core loop of home winemaking better than most beginners: sanitize everything, add yeast to sugar-rich liquid, wait for fermentation (the process where yeast converts sugar into alcohol and carbon dioxide), then clarify and package your finished product. Home winemaking just swaps the malt and hops for grape juice concentrate or fresh juice — and skips the boil entirely. A 6-gallon wine kit (sometimes called a juice kit) is the standard entry point: it contains concentrated grape juice, yeast, fining agents (clarifiers that drop suspended particles out of solution), and sulfites (preservatives that protect the wine from spoiling). Follow the included instructions, add water to bring the volume up to six gallons, and in four to eight weeks you have roughly 28–30 standard 750 mL bottles of finished wine. This guide breaks down what equipment you need to get there, how three common setup tiers compare, and what each bottle realistically costs you once you account for gear amortization and ingredients.
| EDITOR'S PICK[Ultimate Wine Making Equipment…](https://www.amazon.com/dp/B003XDGWT4?tag=greenflower20-20) | Mid-tier[Stainless Steel Fermenter](https://www.amazon.com/dp/B01HIZSEP2?tag=greenflower20-20) | Budget pick[Home Brew Ohio Upgraded 1 Gallo…](https://www.amazon.com/dp/B0130RICU4?tag=greenflower20-20) | |
|---|---|---|---|
| Capacity | 6 Gal | 14 Gal | 1 Gal |
| Material | Glass | Stainless Steel | — |
| Carboy Type | Glass Carboy | Fermenter & Kettle | — |
| Auto-Siphon | — | — | ✓ |
| For Fruit Wine | — | — | ✓ |
| Price | $221.82 | $194.50 | $56.62 |
| See on Amazon → | See on Amazon → | See on Amazon → |
Why a 6-Gallon Setup Makes Sense for the Experienced Homebrewer
Six gallons is the sweet spot for a few converging reasons. It’s the industry-standard size for wine concentrate kits — brands like RJS Craft Winemaking, Winexpert, and Cellar Craft all publish 6-gallon formats — so ingredient availability is never a problem. More importantly, if you already own a 6- or 6.5-gallon carboy (a glass or plastic vessel used as a fermentation container) from your beer brewing, you’re most of the way there on equipment.
The overlap between beer gear and wine gear is real and meaningful. A homebrewer with a standard extract setup already owns a hydrometer (measures sugar content and, by extension, fermentation progress), an auto-siphon, vinyl tubing, a bottle brush, and a no-rinse sanitizer like Star San — all of which transfer directly. Where wine diverges is in clarification and aging: wine kits rely on a two-stage fining process and often need four to six weeks of cold or room-temperature settling that beer fermentations usually don’t require.
Per Brew Your Own Magazine’s “Winemaking for Homebrewers” feature, the most common first-batch mistake from beer brewers is rushing the clarification step. Wine clarity isn’t just aesthetic — heavy tannin compounds and protein haze affect mouthfeel and stability in the bottle. Budget the full timeline the kit recommends.
The Three Equipment Tiers: What You Need vs. What You’d Upgrade To
Tier 1 — Entry Overlap (~$40–$80 in new purchases if you already brew)
If you have a working beer setup, this is what you’re actually buying new:
- A second 6-gallon carboy (glass or PET plastic). You need two: one for primary fermentation, one for racking (transferring wine off settled sediment). PET carboys from brands like FastFerment and the standard Italian glass carboys stocked at homebrew retailers both work. Owners across aggregated reviews consistently flag glass as easier to sanitize visually but heavier and more fragile; PET is lighter and impact-resistant but scratches if you use abrasive cleaners.
- A wine degassing tool (also called a whip). This attaches to a drill and stirs dissolved CO₂ out of the wine before fining agents are added. Dissolved gas prevents clarifiers from working properly. A basic plastic degassing whip runs $8–$12 and is almost universally recommended in MoreBeer’s wine kit instructions as a step beginners skip at their peril.
- Corks and a hand corker (or a floor corker). Standard #9 straight corks and a Portuguese-style hand corker are around $25–$35 combined for a first batch run. If you’re already kegging beer, you can technically keg wine — and several intermediate brewers do — but bottles are the default.
Total new spend at Tier 1 for an existing beer brewer: $55–$90, not counting the ingredient kit itself.
Tier 2 — Dedicated Wine Setup (~$150–$300)
This is where you build a standalone wine station rather than sharing gear with your beer workflow — useful if you’re running concurrent batches.
Additions over Tier 1:
- A floor corker (Portuguese or Italian style). Hand corkers work but create hand fatigue on a 30-bottle run. Floor corkers with a lever mechanism cost $60–$100 and dramatically reduce that friction. Operators who do multiple batches per year consistently recommend this upgrade in WineMaker Magazine’s kit comparison coverage.
- A wine thief (a sampling tube that lets you pull a small amount without contaminating the whole batch). About $8–$15.
- A bottle filler wand with a spring-loaded valve. If you’re used to bottling beer, you already know this one. Wine-specific wands are calibrated slightly differently for the lower carbonation volumes, but beer bottle fillers work fine.
- Shrink capsules (the foil or plastic cap that goes over the cork). Optional but they make finished bottles look professional and protect the cork from drying. A bag of 30 runs about $5–$8.
A dedicated floor corker is the single most quality-of-life upgrade in this tier.
Tier 3 — Intermediate-Enthusiast Setup ($300–$600+)
At this level you’re either doing multiple 6-gallon batches simultaneously, aging wine for 12+ months, or working toward a small-scale operation that needs documented, repeatable process.
Key additions:
- A temperature-controlled fermentation space or chest freezer with a temperature controller (an Inkbird or Ranco controller runs $30–$55). White wines in particular benefit from fermentation temperatures in the 55–65°F range for aroma retention. If you already have a fermentation chamber for lagers, you can run wine batches in the same space — just verify you have headroom for two carboys.
- A vacuum wine pump and stopper set. After a partial bottle is opened (or for topped-up carboys), a hand pump removes oxygen and extends shelf life. Oxygen is the primary enemy of wine in bulk storage — it causes browning and off-flavors over weeks. Vacuum pump kits run $15–$35.
- Glass wine bottles in bulk. At scale, buying 12-packs of clean bottles wholesale runs about $0.50–$0.80/bottle vs. $1.20–$1.80 at retail. The American Homebrewers Association’s home winemaking overview notes that wine bottle quality (uniformity of the neck opening) matters more for corks than it does for beer caps — cheap or irregular bottles cause cork fit problems.
Per-Bottle Cost Breakdown: The Math That Changes the Framing
This is where the economics of home winemaking actually become interesting to someone with a brewer’s mindset.
By the Numbers — 6-Gallon Batch (≈30 bottles at 750 mL)
| Cost Category | Entry Batch | Ongoing Batches |
|---|---|---|
| Ingredient kit (mid-range, e.g., Winexpert Selection) | $85–$110 | $85–$110 |
| Corks (30-count) | $6–$10 | $6–$10 |
| Yeast nutrient / additives (if not in kit) | $3–$6 | $3–$6 |
| Bottles (if purchasing new) | $15–$25 | $0 (reuse) |
| Equipment amortized over 10 batches | $15–$30 | $5–$10 |
| Per-bottle cost range | $4.10–$6.00 | $3.10–$4.20 |
Assumes Tier 1–2 gear; excludes labor time. Kit costs pulled from published retail pricing as of May 2026.
For context: a mid-range grocery store wine at $12–$18/bottle is the competitive benchmark most home winemakers reference. At $3.50–$5.00/bottle from your third or fourth batch onward, you’re producing something in the quality range of a $14–$20 retail bottle (depending heavily on kit selection and process discipline) for roughly 25–35 cents on the dollar.
The kit tier matters here. WineMaker Magazine’s kit comparison guide distinguishes three quality rungs:
- Entry kits (e.g., Winexpert Classic, RJS En Primeur Winery Series at $50–$75): higher water dilution, 4-week timeline, lighter body. Fine for casual table wine.
- Mid-range kits ($85–$120): reduced water addition, grape skin packs included in some reds, richer body and longer cellar life. This is where most intermediate brewers land.
- Premium kits ($130–$200+): minimal water addition or straight juice, region-specific varietals, 8+ week timeline. Reviewers consistently note these produce wines that are difficult to distinguish from good commercial bottles after 6–12 months of bottle aging.
Clarification and Aging: The Step Beer Brewers Underestimate
Here’s the honest tradeoff that doesn’t show up on ingredient kit boxes: wine rewards patience in a way that most beer styles don’t. A two-week IPA (India Pale Ale — a hoppy, bitter beer style often ready to drink quickly) trains homebrewers to think in short timelines. Wine does not work on that schedule.
Most 6-gallon kits use a two-part fining system. Stage one typically uses bentonite (a clay-based fining agent that strips proteins) or kieselsol (a silica-based clarifier). Stage two uses chitosan (derived from shellfish shells — worth noting for vegan wine drinkers) or isinglass. The two-stage process works by creating a charge differential: one finer attracts and binds one class of particle, the other handles the rest. MoreBeer’s wine kit content library explains this mechanism clearly in their inline kit documentation.
The practical implication: after your final fining addition, the wine needs a minimum of 7–14 days of undisturbed settling — and cold temperatures (around 40°F) accelerate this dramatically. A brewer with a fermentation chamber can cold-crash a wine kit in 3–5 days; without temperature control, budget the full two weeks.
Rushing this step is the most common reason home wine ends up hazy in the bottle. Hazy wine isn’t dangerous, but it signals to anyone drinking it that process corners were cut.
Decision Framework: Which Setup Path Fits Your Situation
If you’re a homebrewer who primarily wants to run one or two wine batches per year alongside your beer schedule, Tier 1 overlap gear is the right call. Spend the $55–$90 in new purchases, use your existing carboys and sanitizer, and focus your budget on a higher-quality ingredient kit.
If you’re running three or more batches annually, or want clean separation between your beer and wine workflows, add the floor corker from Tier 2 as your first dedicated upgrade. It’s the piece of equipment that aggregated long-run reviews most consistently identify as the one operators wish they’d bought sooner.
If you’re treating wine as a serious parallel craft — multiple varietals, extended aging, or working toward producing wine for events or gifting at volume — build toward Tier 3’s temperature control and bulk bottle sourcing. The per-bottle math at that scale, with a premium kit, produces a bottle that competes with $18–$22 retail wine for around $4.50–$5.50 in materials.
The cleaner your sanitation, the more patient your clarification timeline, and the better your ingredient kit, the better the result — in almost exactly that order of importance. The equipment is the enabler; the process is the differentiator.